
When you enter the Point Hope lighthouse in Phasmophobia, you’re stepping into one of the most reliable maps for cursed object hunters. Unlike most maps, Point Hope’s seven cursed objects always spawn in fixed locations—no random rolling or searching rooms hoping for luck. For anyone running solo investigations, co-op speedruns, or first-timers who want confidence in what to expect, this structure saves you meaningful time and anxiety.
Cursed objects give you unique opportunities—and risks—during games. Some grant critical clues (like the Ouija Board’s ghost room hints or the Tarot Cards’ resurrection chance). Some add extra ways to trigger hunts or interact with the ghost. On most maps, players debate: “Have you seen the mirror yet?” At Point Hope, you can answer before you even unlock the door. Here’s what you need to know to find and use every cursed object in Point Hope efficiently.
Quick List: Every Cursed Object in Point Hope
Set aside time early to review the full set of seven cursed objects you’re looking for. All appear in the lighthouse section, never the more modern ground floor annex.
– Tarot Cards
– Haunted Mirror
– Ouija Board
– Summoning Circle
– Music Box
– Voodoo Doll
– Monkey Paw
If you play other maps often, you know most rooms might host a cursed object—but on Point Hope, the pattern is constant and simple.
Understanding the Floors: Naming and Structure
The lighthouse is vertically stacked with eight main floors (sometimes called by different names). You start in the ground floor living room. Each higher floor has its own unique function—dining, games, bathroom, bedrooms, and finally a workshop on the top level. Take a picture of the staircase spiral in your mind; the most efficient route checks each floor as you go up, without backtracking.
Room names may differ by guide or community: for example, “Children’s Bedroom” and “Boys’ Blue Bedroom” refer to the same spot, as do “Workshop” and “Maintenance Floor.” This guide uses the most common, search-friendly terms.
Cursed Object Locations by Floor
Ground / 1st Floor: Living Room — Tarot Cards
On entry, head for the main living room space—with two distinctive green couches or armchairs facing each other. The Tarot Cards rest right in the middle, on the table between them. Don’t waste time checking end tables, shelves, or corners—you’ll always find the deck here. Some teams like to use this spot as a rally point, dropping gear before exploring the rest of the lighthouse.
Be sure not to rush drawing Tarot Cards before you’re ready. They can immediately trigger a cursed hunt or other effects that may cut an investigation short.
3rd Floor: Dining / Wine / Bar Area — Haunted Mirror
Climb two floors to a cozy dining and wine room, easy to spot by its blue cabinet (or cupboard) beside the stairs. The Haunted Mirror sits propped against this piece of furniture. This is a frequent check-in for anyone who needs quick access to ghost room clues; just remember that every use of the mirror drains sanity very fast.
If you’re speedrunning with a team, “mirror bar” is a useful callout to confirm you’re in the right place.
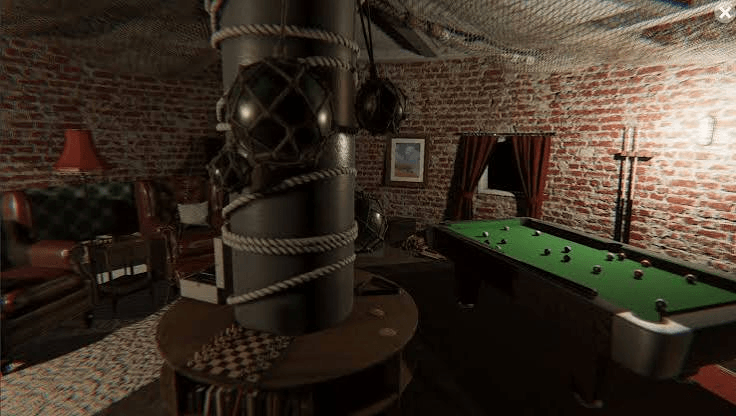
4th Floor: Games / Entertainment Room — Ouija Board
Continue to the next floor and you’ll enter the games room. The focal point here is the pool table, but look more closely at the circular shelf wrapping a central pillar. The Ouija Board rests right on that shelf, usually among or above a few books. Be sure all team members know this shelf; it’s easy to miss if you focus only on the pool table itself.
Use the Ouija Board carefully: it’s one of the best ways to get direct answers, but it quickly drains sanity and will trigger a hunt if you aren’t careful with your goodbye.
5th Floor: Main Bathroom — Summoning Circle
Head up to the floor with tiled flooring and a large bathtub. The Summoning Circle is always on the floor, almost impossible to overlook, right in the center of the main bathroom. Unlike small cursed objects, the Circle takes up significant space. Don’t step inside or use a lighter on the candles unless your whole team is ready for a possible hunt (and likely death).
A common practice is to delay lighting the Summoning Circle until all key objectives are done. That way, you can maximize rewards without risking the whole run early.
6th Floor: Master Bedroom (Red Bedroom) — Music Box
One floor up, you’ll reach the red-themed Master Bedroom—usually easy to recognize by its color. As soon as you enter, look to your right for the vanity table near the door. The Music Box rests here, often with a few makeup items nearby. Many players overlook this spot because they expect to find objects on the main bed; make sure you check the vanity specifically.
The Music Box is best for luring shy ghosts out. Hold it outside the ghost room and listen carefully—if the singing grows louder, you’re getting close, but if the ghost gets triggered, drop everything and run to a safe room.
7th Floor: Child’s / Boys’ Blue Bedroom — Voodoo Doll
Climbing up, you’ll find the blue-themed child’s bedroom. Here, the Voodoo Doll sits on a dresser or a stack of boxes, usually placed near the window or the room’s back wall. Callouts like “doll boys” help speedrunners confirm location—use these for quick communication with your team.
Using the doll can force ghost interactions, which is great for challenge runs or when you need extra evidence. Still, be aware that each use risks an unwanted hunt.
8th Floor: Workshop / Maintenance — Monkey Paw
At the top, enter a workshop overflowing with clutter and tools. The Monkey Paw is always found on the workbench or a cluttered desk—typically next to or near a small wooden or rocking horse. Of all cursed objects, the Monkey Paw is the most game-changing and risky: you can make several magic wishes, but breaking its rules can backfire or endanger your team.
Document every wish made, and consider saving your Monkey Paw uses until you’re ready for anything—good or bad.
Recommended Floor-by-Floor Route for Efficiency
If you want a systematic and rapid sweep, start at the bottom and check each floor as you climb. This not only helps with speedruns or challenge runs, but also ensures you never double back or waste sanity.
Here’s a proven checklist:
1. Ground/1st Floor — Living Room:
Spot Tarot Cards on the central table.
2. 3rd Floor — Dining/Wine/Bar:
Find Haunted Mirror propped against the blue cabinet near the stairs.
3. 4th Floor — Games Room:
Check the circular pillar shelf for the Ouija Board.
4. 5th Floor — Main Bathroom:
Summoning Circle is centered on the floor near the tub.
5. 6th Floor — Master Bedroom:
Inspect the vanity for the Music Box.
6. 7th Floor — Child’s/Boys’ Room:
Search the dresser/boxes near the window for the Voodoo Doll.
7. 8th Floor — Workshop:
Look on the workbench near the rocking horse for the Monkey Paw.
You may assign team members to specific floors, or all move up together as each area is cleared. If someone finds the cursed object, call it out immediately; this saves time and prevents accidental use.
Pros and cons of this route: You minimize backtracking and confusion, and it streamlines communication for friends or speedrunners. The downside is the lack of early exits: if you start at the bottom and need to leave quickly (say, for a cursed hunt gone wrong), you have to descend several floors.
What Happens After You Find a Cursed Object?
Each object here can shape your round dramatically. For example, using the Haunted Mirror might reveal the ghost location but cost you most of your sanity, leaving you at risk for a hunt. The Summoning Circle, Monkey Paw, and Tarot Cards all have potential for instant danger as well as game-changing rewards.
Be sure you have:
– Smudge sticks and a lighter within reach
– A plan in case someone triggers a hunt
– Enough sanity pills for after using sanity-draining effects
If you’re running with new players, explain each object’s potential effects before using them. A quick demo or verbal walkthrough can prevent team wipes.
Tips for Getting the Most Out of Each Run
Plan your cursed object route the same way you’d map out essential business systems: minimize waste, confirm your plan, and document your steps. Think in checklists. For group play, lay out rules for who gets to use which object and when, and record results. Treat cursed objects as both resources and liabilities—they’re tools that can push you closer to victory or force a restart.
It depends on your goals. If you’re chasing quick evidence, you may want to activate cursed objects fast. For zero-risk runs, you’ll want to avoid interactions until late-game.
Keep personal and group safety foremost. If a run goes sideways, regroup at the ground-floor living room. Always track which objects remain—forgetting can lead to preventable losses.
Using This Guide For Smarter, Faster Point Hope Runs
In a business sense, efficient object-finding is like streamlining your workflow: each step, each floor, and each check-in adds up to less time spent wandering—and more time focused on winning. Use the fixed spawn points and floor order for higher success rates and smoother teamwork. Convert your findings into repeatable processes for every new run.
For more action-driven checklists and resource roadmaps, you may also find value at genbusinesslab.com, especially if you like organizing playbooks or running efficiency tests across different platforms or teamwork environments.
Conclusion: Why Mastering Point Hope’s Cursed Objects Pays Off
Point Hope’s predictable, fixed cursed object locations offer you a rare form of control in Phasmophobia. Learn each floor and spot, use efficient callouts, and assign responsibility when you can. Apply the same careful documentation and systemization you use in business to your ghost hunting. Doing so reduces risk, keeps your runs on target, and gives you the clarity to tackle tougher objectives every time.
Set aside a little prep at the start of each round to map out your steps. With a floor plan in your head and this checklist by your side, you can make Point Hope one of the most productive maps in your rotation—whether you’re going for all-the-evidence, speed, or simple fun with friends.
Also Read This: